TL;DR: CODE. Cache-aside (lazy loading) is what you should start with, it covers 90% of use cases. Pair it with write-through for data freshness, add TTL jitter to prevent thundering herds, and consider in-process caching with
mokafor hot data. All of this runs beautifully on ElastiCache Serverless for Valkey.
Before I start a disclaimer: I work as a Developer Advocate at AWS, and I get to interact with the wonderful folks who build and run the ElastiCache Services. Just thought you should know that going in ❤️ On to the show …
I recently made a video on database caching strategies where I explored caching patterns, Rust code, and how to set this up on AWS with Valkey. This post is a companion to that video. The code, the key patterns, and the gotchas, all in one place you can reference later.
Here’s the thing, I initially thought caching was complex and unnecessary. My database was “fast enough.” But going from ~100ms database reads to single-digit millisecond cache hits? That makes a real difference. And it’s way simpler to set up than I expected.
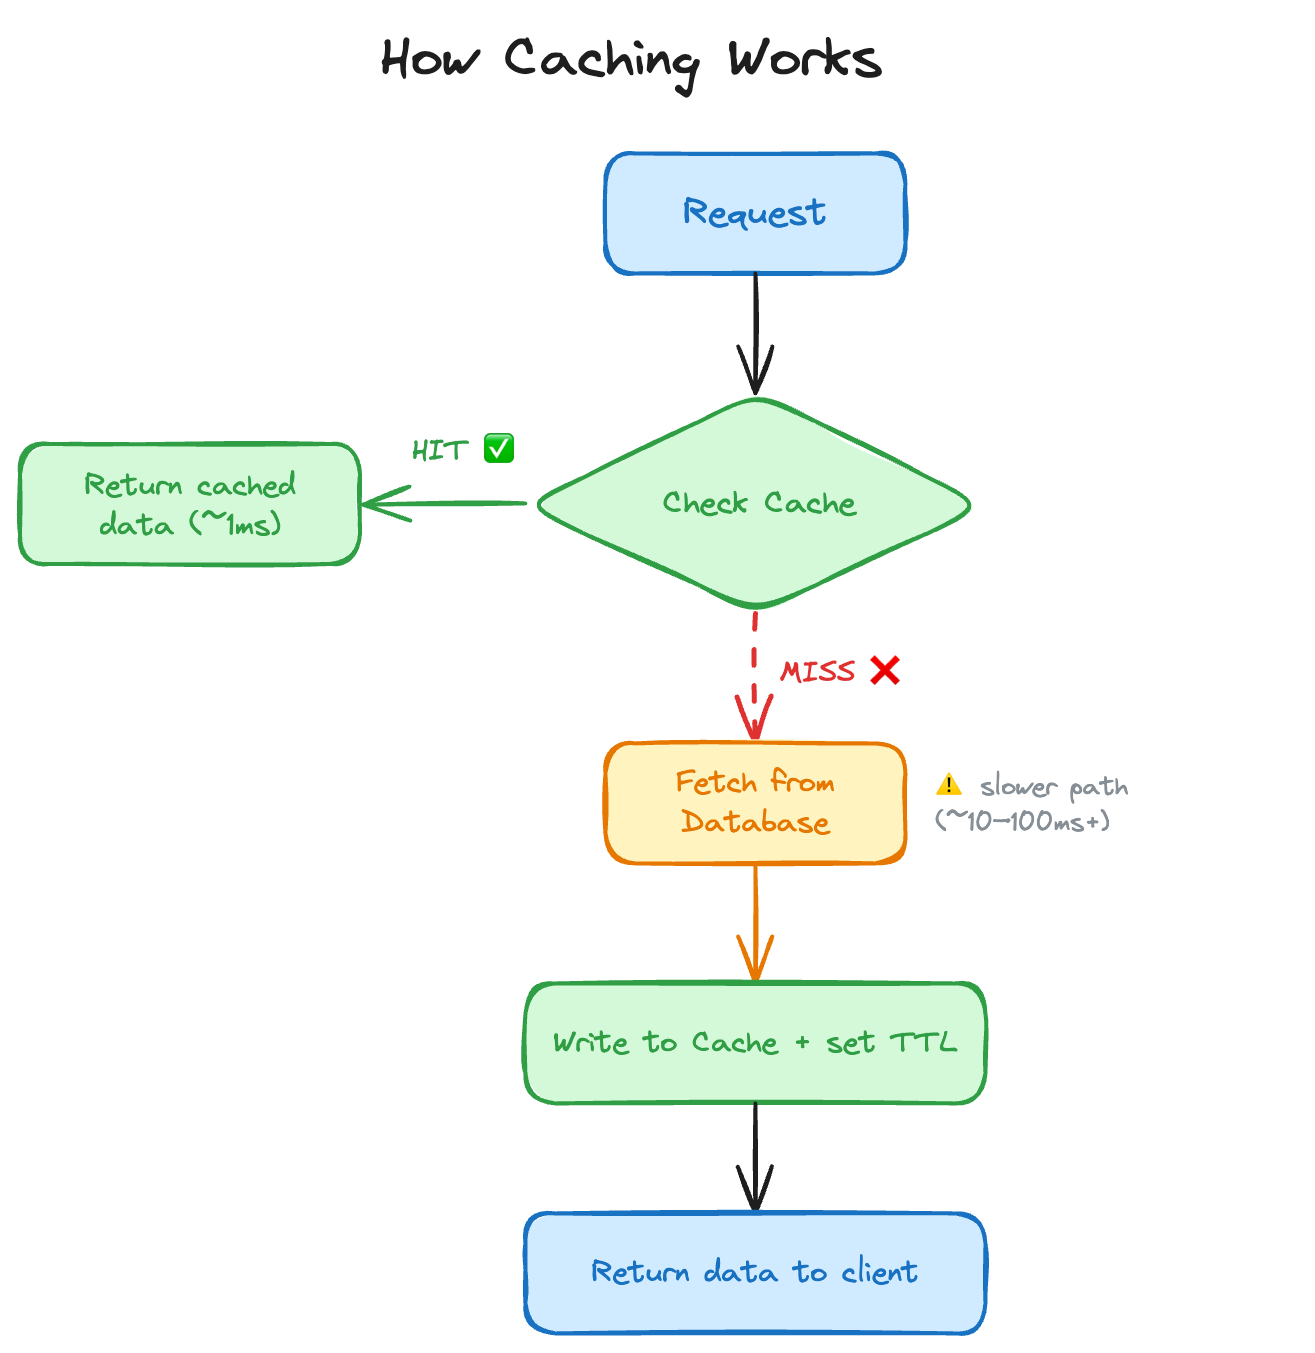
The concept is straightforward: put a fast in-memory store (like Valkey) between your app and your database. Check the cache first, only hit the database if you have to.
There are five caching patterns out there, but honestly? Knowing just two of them is fine. Here’s the full picture for reference:
| Pattern | Write goes to | Read goes to | Tradeoff |
|---|---|---|---|
| Cache-Aside | DB only | Cache, then DB on miss | Simple, but cache can be stale |
| Write-Through | Cache + DB (sync) | Cache first (always fresh) | Write latency doubles |
| Write-Behind | Cache only (DB async) | Cache first | Fast writes, risk of data loss |
| Read-Through | DB (via cache) | Cache (cache fetches on miss) | Clean API, hard to implement in Valkey |
| Write-Around | DB only (skip cache) | Cache, then DB on miss | Good for rarely-read writes |
Let’s focus on the two that matter: Cache-Aside and Write-Through 🥳
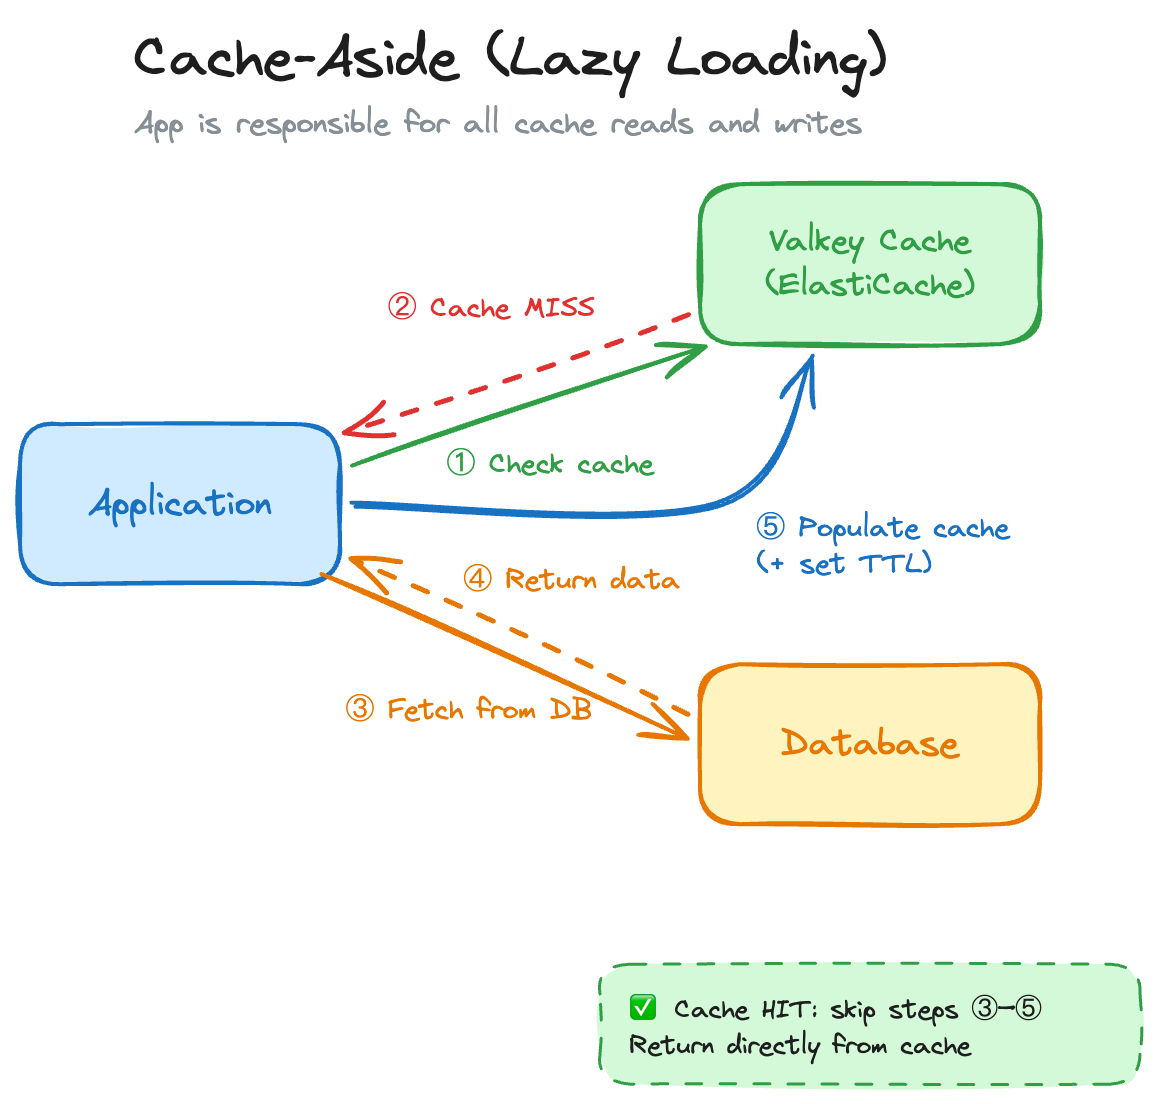
This is the default. 90% of the time, this is what you want. The idea: your application is in charge of the cache. Nothing gets cached until it’s actually asked for.
The flow:
async fn get_user(
    id: &str,
    cache: &mut redis::aio::MultiplexedConnection,
    db: &SqlitePool,
) -> Result<User> {
    // 1. Check cache
    let cached: Option<String> = cache.get(id).await?;
    if let Some(json) = cached {
        println!("[CACHE HIT]  id={id}");
        return Ok(serde_json::from_str(&json)?);
    }

    // 2. Cache miss: fetch from DB
    println!("[CACHE MISS] id={id} - querying SQLite...");
    let user = sqlx::query_as::<_, User>("SELECT id, name, email FROM users WHERE id = ?")
        .bind(id)
        .fetch_one(db)
        .await
        .with_context(|| format!("user {id} not found in DB"))?;

    // 3. Populate cache with a 30-second TTL
    let json = serde_json::to_string(&user)?;
    let _: () = cache.set_ex(id, json, 30u64).await?;

    Ok(user)
}
Why it’s great: Only data that’s actually requested gets cached (no wasted memory), and if the cache goes down, your app still works, it just falls back to the database. Resilient by design.
Now, there are a few things you need to watch out for when working with this approach:
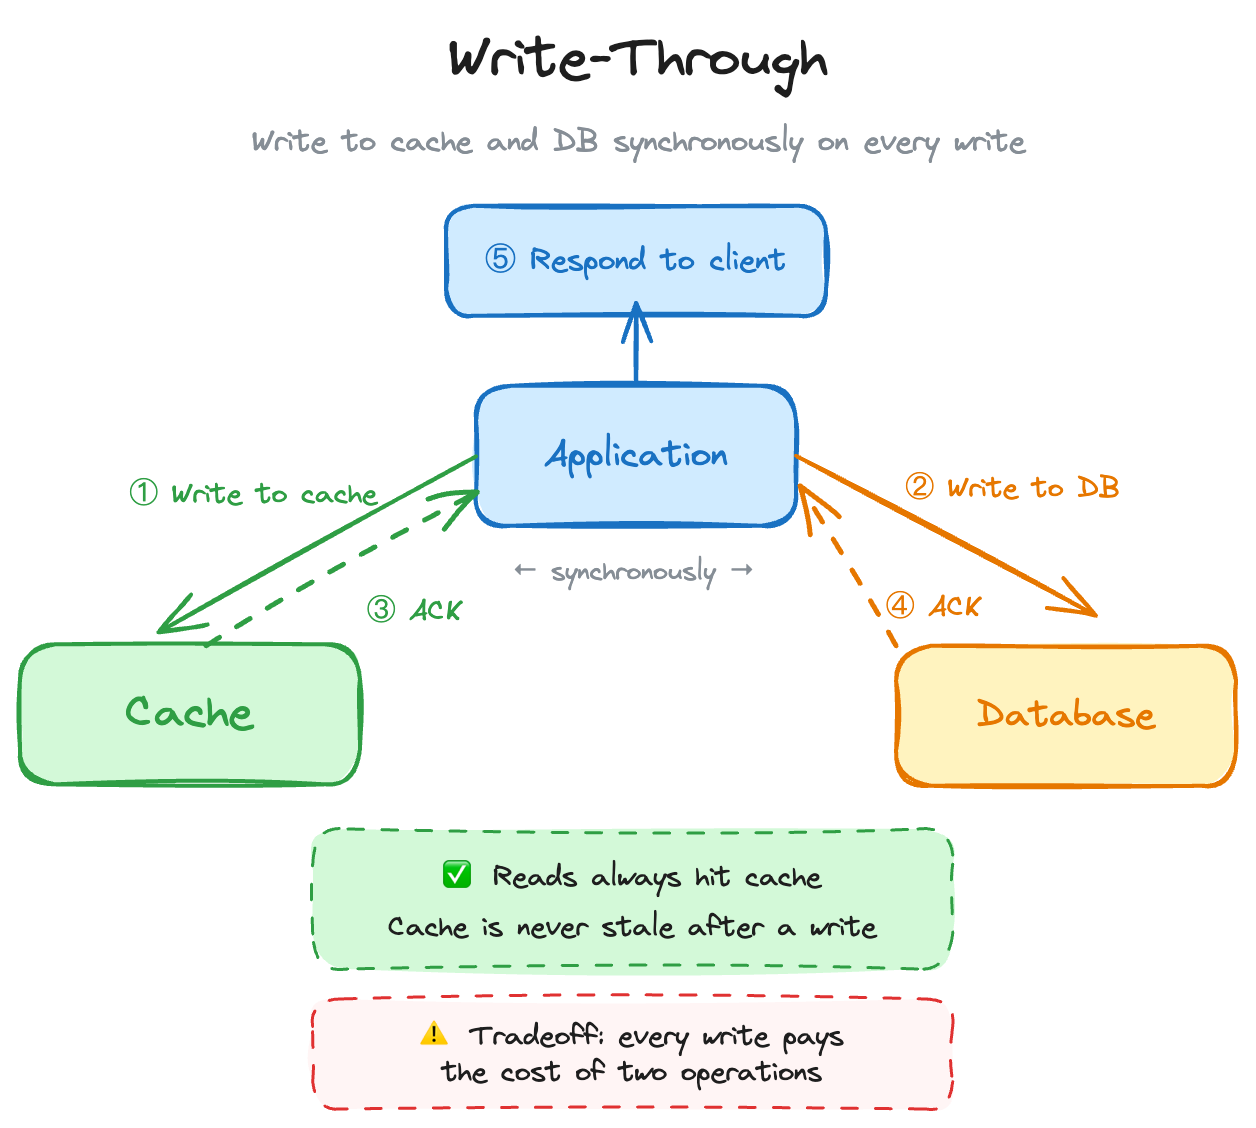
Write-through is almost always used alongside cache-aside. The difference: it doesn’t only cache data when it’s read, it also updates the cache every time you write to the database. Stale data begone!
async fn update_user(
    user: &User,
    cache: &mut redis::aio::MultiplexedConnection,
    db: &SqlitePool,
) -> Result<()> {
    // 1. Write to DB first
    sqlx::query("UPDATE users SET name = ?, email = ? WHERE id = ?")
        .bind(&user.name)
        .bind(&user.email)
        .bind(&user.id)
        .execute(db)
        .await?;

    // 2. Write to cache: keep them in sync
    let _: () = cache
        .set_ex(&user.id, serde_json::to_string(user)?, 300u64)
        .await?;

    Ok(())
}
So… When do you use this over the other one? Well, it’s simple, when you have read-heavy workloads where data freshness is critical (user profiles, inventory, pricing). Simple as that. However, when you have write-heavy workloads. Doubling every write (DB + cache) adds up fast. Also, infrequently-read data ends up in the cache for no reason, making your cache bigger and more expensive. You may wanna skip this one.
This can’t be just all great, right? It cant be that simple. 🤔 You’re right, there are a few gotchas when it comes to caching, that may trip you up initially. They are not something that is unsolveable, but it is something to keep in mind as you are building stuff out.
First off, Serialization. Yes this really depends on the language and framework you are using, but this can be an issue. For example, in Rust, redis-rs gives you back raw String types. You must serialize/deserialize structs yourself with serde in order for this to work. Now, for small objects this is nothing, but with larger payloads, keep this overhead in mind.
TTL: Time To Live. This is what tells the cache how long the objects there should live. This CAN be quite a challenge to solve. Too short and you get constant cache misses. Too long and you serve stale data. There’s no universal answer here, you need to understand your data’s update patterns and set TTLs accordingly. The good thing is, you can change this relatively easily.
Phil Karlton famously said: “There are only two hard things in computer science: cache invalidation and naming things.”
Instead of updating the cache on every write (write-through), you can just delete the cache entry. The next read will miss and fetch fresh data from the DB:
async fn update_user(
    user: &User,
    cache: &mut redis::aio::MultiplexedConnection,
    db: &SqlitePool,
) -> Result<()> {
    // 1. DB write - source of truth updated first
    sqlx::query("UPDATE users SET name = ?, email = ? WHERE id = ?")
        .bind(&user.name)
        .bind(&user.email)
        .bind(&user.id)
        .execute(db)
        .await?;

    // 2. Invalidate cache - don't update it, just remove it
    let _: () = cache.del(&user.id).await?;

    Ok(())
}
This is a nice middle ground: simpler than write-through, and your cache-aside pattern handles re-populating the data on the next read. 🔥
The first time I’ve heard the term “Thundering Herd” was from my friends over at Puppet. In their example it was when too many systems check into the Puppet configuration server at once, and cause the server a lot of pain. Well, similar things can happen with caching. If a bunch of cache entries share the same TTL (and are written at the same time), they all expire at the same time. Suddenly every request is a cache miss and your database gets hammered. The fix is dead simple: ✨Jitter✨. Yes, just add jitter to your TTLs:
fn ttl_with_jitter(base_secs: u64, jitter_secs: u64) -> u64 {
    let nanos = SystemTime::now()
        .duration_since(UNIX_EPOCH)
        .expect("system clock before UNIX epoch")
        .subsec_nanos() as u64;

    base_secs + (nanos % jitter_secs)
}

// Instead of a flat 300s TTL, you get something between 300s and 360s
let ttl = ttl_with_jitter(300, 60);
let _: () = cache.set_ex(id, json, ttl).await?;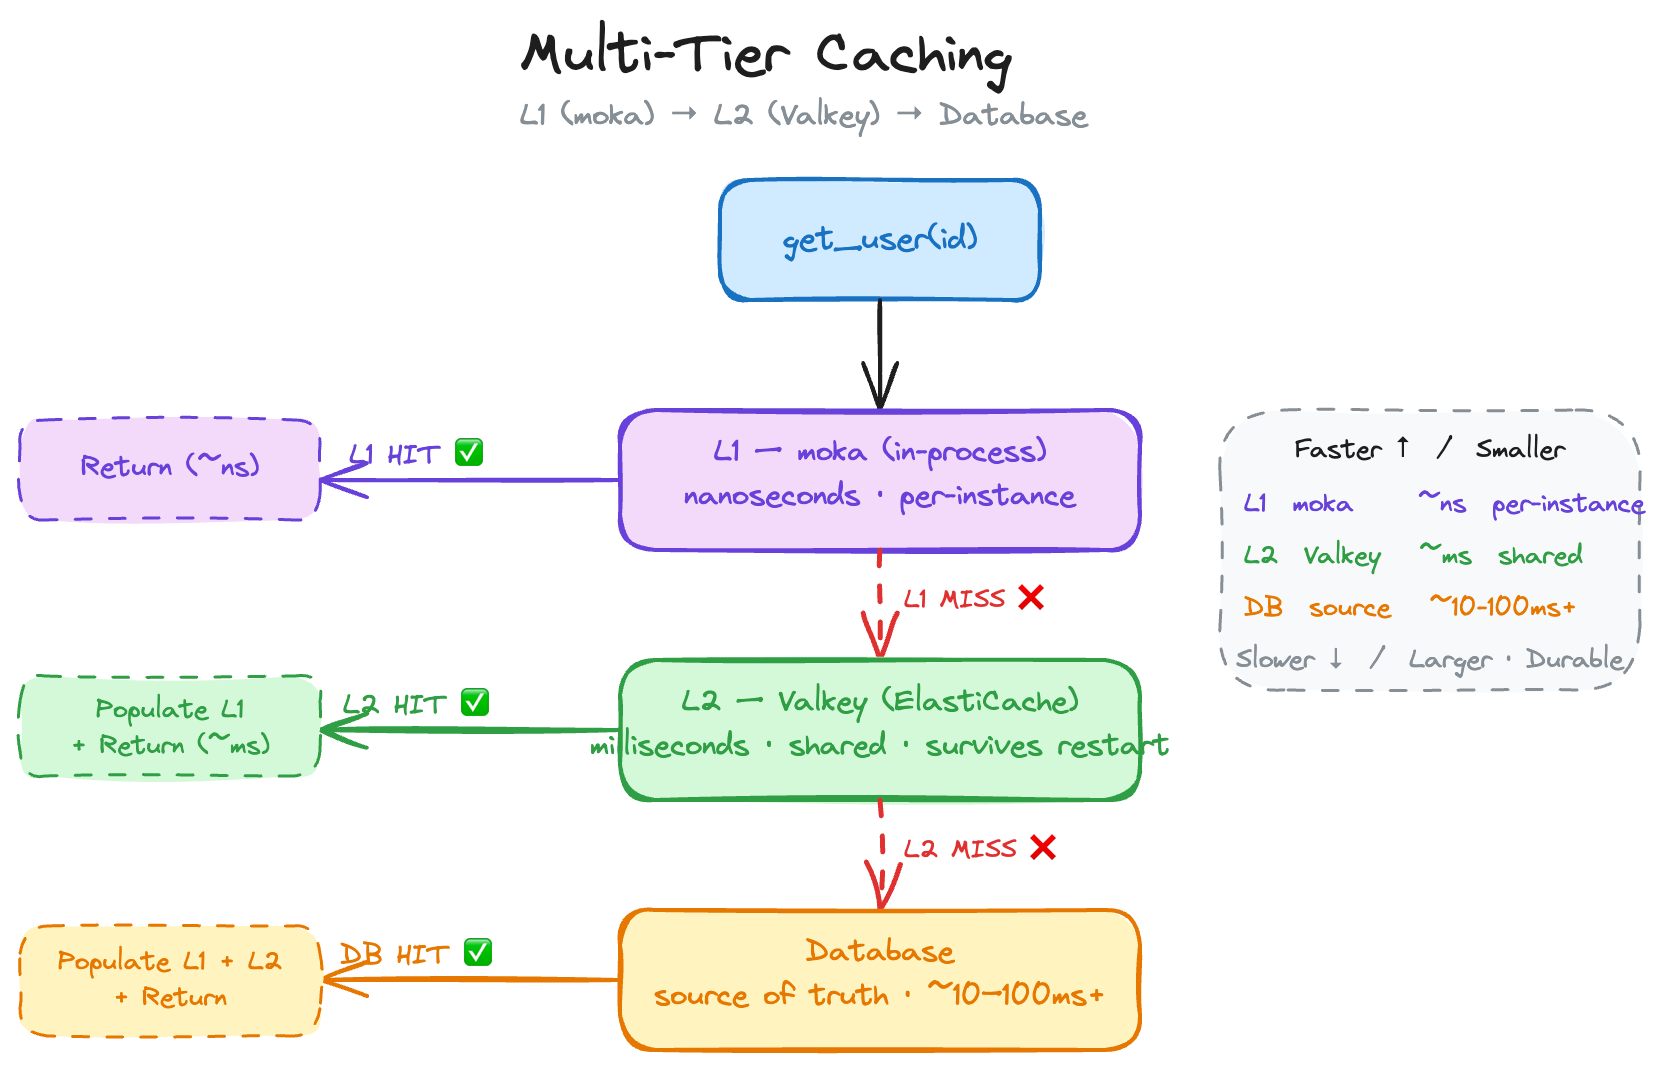
Here’s a pro tip: you don’t have to go over the network for every cache lookup. For long-running applications (not looking at you Lambda 👀), you can keep a small in-process cache using moka (or an equivalent library) in front of your cache:
// Note: Simplified for example
async fn get_user(id: &str, l1: &Cache<String, User>) -> Result<User> {
    // L1: check in-process moka cache first (nanoseconds)
    if let Some(user) = l1.get(id).await {
        return Ok(user);
    }

    // L2: check Valkey (milliseconds)
    if let Some(user) = fetch_from_valkey(id).await? {
        l1.insert(id.to_string(), user.clone()).await;
        return Ok(user);
    }

    // L3: DB, source of truth (slower)
    let user = fetch_from_db(id).await?;
    l1.insert(id.to_string(), user.clone()).await;

    Ok(user)
}
L1 (moka) is nanosecond latency, straight from your process memory. L2 (Valkey) is milliseconds, shared across instances. L3, the DB is your source of truth.
Heads up: local cache is not shared across instances. In horizontally-scaled deployments, you’ll get brief inconsistencies between instances. And in Lambda, the container lifecycle makes this kind of unreliable. You have been warned.
Alright, time to talk about Valkey! 🥳 Valkey is the open-source Redis fork under the Linux Foundation (started March 2024). AWS here is a top contributor. What is important for you to understand: it’s a drop-in Redis replacement. Your redis-rs (or whatever other library) code works with it unchanged. Huzzah!
On AWS, you run Valkey through Amazon ElastiCache. The two options:
One thing to remember: ElastiCache is a VPC-based service. Your application needs to be in the same VPC. If you’re using Lambda, that means VPC-attached Lambda functions, which can add some cold start latency. What this also means is that you cannot really easily access the cluster from outside of AWS. In the video I actually ran my code on an EC2 instance. (But this can be made work with some VPN shenanigans).
Setting it up is surprisingly dead simple: Point your redis-rs connection to the ElastiCache endpoint, and poof, You’re done. Check out the setup part in the video.
Alright friends, my TTL is about to expire, so time to wrap it up. Yeah … I know! 😅
Caching is one of those things that sounds intimidating until you actually do it. Start with cache-aside (it’s literally a few lines added to your data fetching functions). Then layer on write-through or invalidation as needed. Add TTL jitter from day one (your future self will thank you later). And if you’re lookin for a serverless Redis option, well on AWS, ElastiCache Serverless for Valkey makes the infrastructure part trivial. 👏
All the code from this post (and the video) is on GitHub: darko-mesaros/caching_strategies_sample_code
Happy caching! 🦀